Monthly Archives: August 2014

CyanogenMod for HTC Desire C

I have been pondering for a while if I should install CyanogenMod (custom Android ROM) to my phone. In the end, I have decided to give it a shot:

  • My phone is HTC Desire C (HTCDC) – really old and slow. The stock Android worked fine.. for a time. After that, it really slowed down.
  • HTC won’t release a new version of Android – It is old device that is not even sold anymore. It makes no sense for them to invest into a new version of Android (the installed one is 4.0.3) and pushing it to the customers.
  • HTC is using a HTC Sense – Modified Android with a lot of value added software bloatware, like DropBox and Facebook. Because the bloatware is installed on system partition, I can’t uninstall it without root. I would also like a stock version of Android.
  • Privacy – The Andoird permission system is terrible. You can only approve permissions during installation even if your app requires them once in a blue moon (e.g. sending SMS for two step verification).
  • The recent “simplification” of permissions – All apps can now access the internet and if you can only grant permissions per category.

I get it, Google is an advertising company – giving user an option to block the adds is completely at odds with their business model. On the other hand they could at least try to have some balance. Also, most users don’t care. I kind of do, so I decided to root my phone and install CyanogenMod.

CyanogenMod

TinyCM Android

Tiny CyanogenMod (TinyCM) hoem screen along with few app

Android is open source and that means there are geeks out there working hard to create custom versions of it. Out of them the CyanogenMod is the most popular and known. It was obvious choice, but unfortunately, the HTC Desire C is not on the official list of supported devices. It is however on the list of unofficially supported devices, but don’t waste time – the ROM in the referenced forum thread doesn’t work (it works for someone, but not for me).

I had success with the MiniCM 10 – V8, in order to install it you have to follow rather complicated process.

This is really high level guide, it explains more why not, how. If you want to really install it, you should read How To Install A ROM Or App From Zip File To Android Device From Recovery.

Understanding the partitions

Android is a Linux, it is a normal operating system and it uses several partitions for different tasks. Replacing the stock Android is a process of replacing content of the partitions. It is well explained on the addictivetips. You really should read it in order to understand the process.

Unlock bootloader

First, you have to unlock the bootloader, HTC gives an official way to do it, but you have to get a key from the HTC. The key is different for each phone. There is a great step-by-step video for HTCDC on Youtube.

Unlocking the bootloader will allow you to upload the custom recovery OS to the /recovery partition.

Installing recovery

Recovery is basically self-container OS on a separate partition that is used to update/backup/restore the main Android OS plus few other things. The recovery supplied with the phone is usually very limited so there are other recoveries out there, the most known are Team Win Recovery Project (TWRP) and ClockWorkMod (CWM). Although HTCDC is among supported phones for TWRP, it didn’t work for me. I could install it and 2.7 didn’t even boot, while later versions booted, but screen was corrupted and I couldn’t swipe (TWRP is touch based) – e.g. backup required to swipe the screen.

CWM officially doesn’t support HTCDC, but I have found a version that worked for me (forum thread, recovery image). It has no frills interface, but it does the job.

Backup the stock Android

Yes, it is not an option, it is a necessity. I have gone through several ROMS before finding one that works.

CWM backup will all partitions (see the headline above) from the internal memory to the external SD card :

  • /boot partition (as in boot.img),
  • /recovery partition (as recovery.img)
  • /system partition – it saves the files on the partition as blobs and adds the system.ext4.dup with info how they fit on the partition
  • /data partition – User data of apps, e.g. your preferences ect.
  • /cache partition – Cache of davik bytecode compiled to ARM native code or something like that. The cache partition can be deleted.

Do a full wipe

You can find this in most threads with custom ROMS: Do a FULL WIPE first. Full Wipe means format /system, /data, /cache.

That basically means go to recovery mode, and format the /system, /data and /cache partitions. I have also wiped out the davik cache (CWM-Advanced-Wipe Davik Cache), but I believe it is redundant, because it is stored on of the formatted partitions.

This step is necessary because old files can interfere with the new ones.

Installing the custom ROM

The custom ROM (at least MiniCM V8 and few others) consists from the parts:

  • Files for /system partition that will be copied to the /system partition
  • boot.img with new kernel and other stuff

You have to have the ROM file on the SD card beforehand. Just choose “install from zip” from the CWM menu, select zip file on your SD card and it will install the files to the /system.

After that boot to the bootloaded and flash the boot.img for the ROM to the /boot partition.

Conclusion

So far the ROM mostly works, it seems faster and I could install XPosed framework and the XPrivacy module, giving me more control over which app can do what (e.g. I can deny some app to download from internet – mostly ads).


There are some small errors:

  • When downloading from the google store, I get error 941 first time I try to download an app. It works the second time. There are quite a few people on the net with same problem and it should be resolvable.
  • The panorama mode of the photo app is broken – The image shows green horizontal lines.

It should also be noted that apps in CyanogenMode are from Android Open Source Project (the vanilla Android, without any Google stuff like Gmail or Google Play), and because of tightening grip of Google, some features are missing, for more info read Google’s iron grip on Android: Controlling open source by any means necessary. It is a great corporate strategy, but it shows the reality of open source vs money. Money wins all the time – every Google stockholder approves.

Overall I am satisfied, although I hoped for much easier process. It reading and the process itself took me at least 6 hours.

References

Circular Dependency in Unity

I have been toying around with an idea of replacing the ObjectBuilder in the WCSF with a proper dependency injector. The Unity seemed like the obvious choice (someone even tried porting WCSF to Unity) so I have been reading Dependency Injection with Unity.

During my research I have stumbled upon the ugly side of the Unity: It can’t detect circular dependencies. I though that it is only true in some old version, it would be hell trying to find the circular dependency only with StackOverflowException so I tested it out. After all “One good test is worth a thousand expert opinions”:

public interface IA {}
public interface IB {}

public class A : IA
{
  public A(IB ib) {}
}

public class B : IB
{
  public B(IA ia) {}
}

[TestMethod]
public void UnityContainer()
{
  using (var container = new UnityContainer())
  {
    container.RegisterType<IA, A>();
    container.RegisterType<IB, B>();
    container.Resolve<IA>();
  }
}

It crashed, hard. The test didn’t pass, nor fail. I just got

—— Run test started ——
The active Test Run was aborted because the execution process exited unexpectedly. To investigate further, enable local crash dumps either at the machine level or for process vstest.executionengine.x86.exe. Go to more details: http://go.microsoft.com/fwlink/?linkid=232477
========== Run test finished: 0 run (0:00:05,2708735) ==========

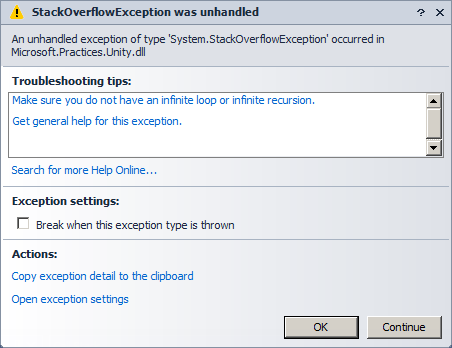
Unity_CircularDependency_StackOverflowExceptionDuring debugging the test, I got the dreaded StackOverflowException, so there it is: No detection of circular dependencies in the Unity and that is the reason why I won’t be using it. There are other fishes in the barrel.

I have tried Ninject and Castle Windsor, thankfully, both detect circular dependencies and throw exceptions with meaningful messages. Ninject has this error message:

Ninject.ActivationException: Error activating IA using binding from IA to A
A cyclical dependency was detected between the constructors of two services.
Activation path:
3) Injection of dependency IA into parameter ia of constructor of type B
2) Injection of dependency IB into parameter ib of constructor of type A
1) Request for IA

Suggestions:
1) Ensure that you have not declared a dependency for IA on any implementations of the service.
2) Consider combining the services into a single one to remove the cycle.
3) Use property injection instead of constructor injection, and implement IInitializable
if you need initialization logic to be run after property values have been injected.

While Castle exception has this message:

Castle.MicroKernel.CircularDependencyException: Dependency cycle has been detected when trying to resolve component ‘UnityTest.A’.
The resolution tree that resulted in the cycle is the following:
Component ‘UnityTest.A’ resolved as dependency of
component ‘UnityTest.B’ resolved as dependency of
component ‘UnityTest.A’ which is the root component being resolved.

I am not impressed with the simplicity of the Castle nor with documentation of the Ninject, but I don’t want a nightmare of circular dependencies without meaningful error message in my project.

Chained web.config transformation

ASP.NET apps have a global configuration file called Web.config and because apps are published in several configurations (e.g. Debug and Release), there is a simple way to transform the web.config using transformation files instead of keeping two nearly identical web.config files at once. It is a great feature (it also works for App.config).

It works like this: you have a base Web.config and transformation files named Web.$(configuration).config (e.g. Web.Release.config) that transform the original Web.config (e.g. specifying smtp server) during deploy or publish.

The transformation files make it very easy to change Web.config, e.g. following snippet adds a key to the appSettings section.

<?xml version="1.0" encoding="utf-8"?>
<!-- For more information on using web.config transformation 
visit http://go.microsoft.com/fwlink/?LinkId=125889 -->
<configuration xmlns:xdt="http://schemas.microsoft.com/XML-Document-Transform">
  <appSettings>
    <add key="Version" value="3.15" xdt:Transform="Insert"/>
  </appSettings>
</configuration>

You can look up info about possible transformations in the official documentation or for quick review go to the Scott Hanselman blog.

This allows one transformation, but you can have two chained transformations if you use publish profiles.

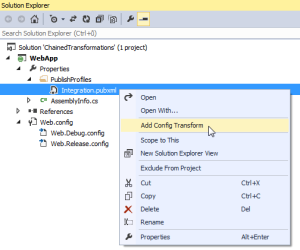
It is simple to do, in the context menu of the profile click on the Add Config Transform and Visual Studio will create a new transformation file that is applied after the build configuration transformation.

add-config-transform

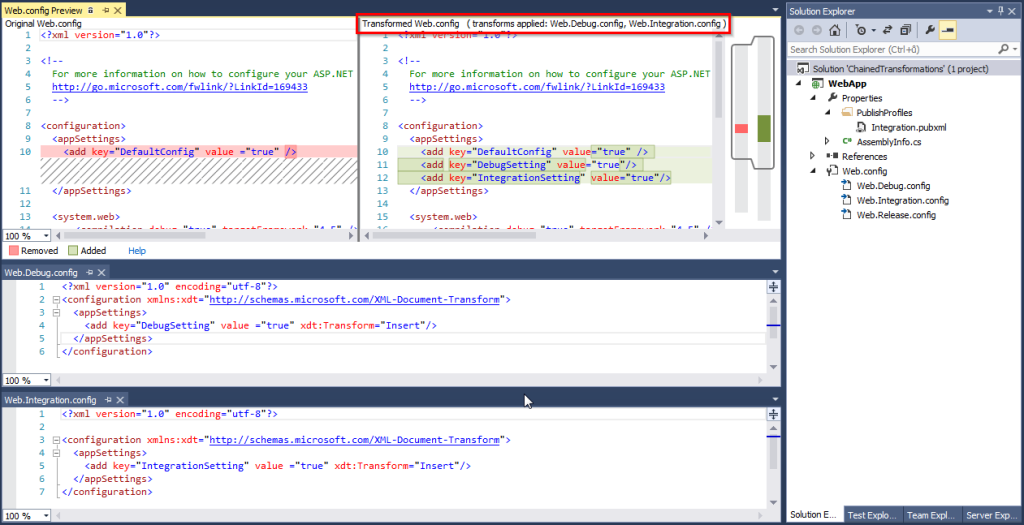
In the following image you can see the result of staged transformation (Web.Debug.config and then Web.Integration.config, see red rectangle). You can see the diff between the original Web.config and transformed one using the “Preview Transform” item of the Web.$(configuration).config context menu.


web.config-chained-transformation

I thought it would be great, we have 5 different environments (local, CI, INT, ACC, PROD) and for each one two web.configs (i.e. 10 configs in total) that have to be kept in sync. It is a lot of rather error prone work. While testing it out, I encountered following problems:

Web.config is transformed only on publish, not build

We use Visual Studio to program and debug our application, so we simply choose Debug -> Start without debugging. That is troublesome, because the app will use the original, untransformed Web.config, because transformation is done only on Publish or Deploy and the resulting Web.config is stored somewhere else.

I often debug app, change Web.config and the IIS automatically detects that Web.config has changed and reloads the site. When I configured logging, I changed web.config a lot of time.

I am of course not the first person to encounter this, so there are some solutions. The *.csproj project file is only a MSBuild script, it can be modified.

  • Rename the base Web.config to Web.generic.config
  • Open your *.csproj file in text editor
  • Uncomment  <Target Name="AfterBuild"> target in the *.csproj. It is commented out along with   <Target Name="BeforeBuild"> target.
  • Add the TransformXml for Web.Config into the target
    <Target Name="AfterBuild">
      <TransformXml Source="Web.Generic.Config"
                    Transform="$(ProjectConfigTransformFileName)"
                    Destination="Web.Config" />  
    </Target>
    

Now, every time the project is build, the Web.config will be changed. Note that this doesn’t support chained transformation, so only build configuration is applied.

For details see the Making Visual Studio 2010 Web.config Transformations Apply on Every Build. You can also look at this forum thread that provides some other suggestions.

Sensitive information must not be in transformation file

Some information, e.g. password to our production database is not available to developers, so it can’t be in the transformation files, yet I want simple and reliable deploy to production I (as a developer) can do without our PM present. I am hoping to use a Web Deploy Parameters to do that.

References


Builders in WCSF

Expect more details about mini-DI in WCSF. Be sure to read previous posts before this one.

WCSF has a two builders (i.e. builders that instantiate the requested objects), they are identical objects (and use identical type and service mappings), but have one crucial difference – singleton policy:

  • ApplicationBuilder – Builder used by the modules and thus in Module Initializers (MI). Its singleton policy is such, that created singletons are stored in the ILocatior. When MI adds a service to the module (e.g. using a container.ServicesNew<SomeService,ISomeService>()), the application builder is used and real singleton service is created. The service is available to all objects in the module and all child modules (unless they overwrite service mapping).
  • PageBuilder – Used by the pages and web controls. WCSF has a lot of slightly tailored WebControls in Microsoft.Practices.CompositeWeb.Web.UI that are subclasses from System.Web.UI, so with WCSF you use the Microsoft.Practices.CompositeWeb.Web.UI.Page instead of System.Web.UI.Page. The singleton policy is such that objects created by this builder are never added to the ILocator thus are never singletons.

Why is there a PageBuilder? The reason is simple, the PageBuilder is used only by the WCSF WebControls to build up the properties of the WebControls. The WCSF WebControls themselves are not instantiated by the ObjectBuilder, but by ASP.NET. The ObjectBuilder comes into a play using the a code in the event methods of the WCSF WebControls (that is the reason why they are there). The WCSF is using PageBuilder to populate the properties of a page using ObjectBuilder, e.g. in OnPreInit method of Page object, OnInit method of MasterPage and so on.

The WebControls themselves are never singletons thus the singleton policy of the PageBuilder and ApplicationBuilder differ.

Crucial difference

Just because PageBuilder doesn’t store singletons doesn’t mean that it always created a new service instance for services. Thanks to default order of the strategies and common ILocator, if it finds a [ServiceDependency], it will locate the service in the ILocator (populated in ModuleInitializer) and uses already existing instance!

The difference in singleton policy is only if created instance is stored in ILocator or not. If there already is an instance, the WCSF will use it.

Basically they tried to work around the problem of how to build up a page we haven’t instantiated. They build it up (=fill public [CreateNew]/[ServiceDependency] properties) in the OnPreInit/OnInit methods of WebControls.

How to use

You use PageBuilder automatically when you use WCSF WebControl. If you really need to use it, call static method WebClientApplication.BuildItemWithCurrentContext(objectToBeBuild).

The ApplicationBuilder property is in Global.asax (the page is derived from the WebClientApplication). To use application builder, follow the code of the BuildItemWithCurrentContext. Basically you need

IModuleContainerLocatorService – WCSF service to locate module from the URL of the page. Use the current URL and get a CompositionContainer of a module.

From CompositionContainer get ILocator and call

webApp.ApplicationBuilder<TypeToBeBuild>(locator, idToBuild, nullOrExistingObject);

For more info, just dive into the source (or not.. I would rather not).

Changing precision of a column in the Oracle

Sometimes, we want to change the format of a column in database, say from NUMBER(12,2) to NUMBER(15,5). The first number is precision (number of digits) and second is scale (number of decimal places), e.g 15,5 means 10 whole numbers and 5 decimal places. For more info, see Oracle documentation.

The precision is limited to 38 (or use * as synonym) and in our db I have seen disturbing number of declarations like WORKLOAD(38,2). Oracle makes it easy to increase scale, but only if you also can increase precision:

-- The column is NUMBER(12,2)
alter table T_TEST modify (WORKLOAD NUMBER(15,5))

If you use 38 or * as precision, it gets more complicated and you have to do the heavy lifting on your own, because there are data that could potentially be lost. Most common way is to create a second column, copy the data, drop original column and rename former column. The other way is to set the original column to null and then you can use the alter table from above (see Stack Overflow for more details).

That works, but there may be constraints and you can lose stuff, not to mention it is a lot of work, prone to error… it would be nice to create a procedure that allows user to change format of the column.

Limitations:

  • Expects that column is a NUMBER
  • Expects that PK is named id

Requirements:

  • Inplace change, won’t change column ordering
  • Must works even if column has some constraints
  • Must not lose data, e.g. changing from NUMBER(7,3) to NUMBER(5,2) will work, but only if there is no row that has a column with number like 12.456 or 1234.
  • Must work across schema

set serveroutput on
declare
  p_owner varchar2(64 char) := 'APPLICATION';
  p_table varchar2(64 char) := 'T_TEST';
  p_column varchar2(64 char) := 'NUM';
  p_format varchar2(64 char) := 'NUMBER(15,5)';
  l_sql varchar2(512 char);
  l_temp_col varchar2(64 char);
  l_diff_ids clob; -- there can be quite a lot of different ids
  
  procedure disable_constraints(p_owner varchar2, p_table varchar2, p_column varchar2) is
    l_sql varchar2(512 char);
  begin
    for l_constraint in (select owner, table_name, constraint_name from ALL_CONS_COLUMNS 
                                where owner = p_owner
                                  and table_name = p_table
                                  and column_name = p_column)
    loop
      -- disable constraints 
      l_sql := 'alter table ' || l_constraint.owner || '.' || l_constraint.table_name || ' disable constraint ' || l_constraint.constraint_name;
      dbms_output.put_line(l_sql);
      execute immediate l_sql;
    end loop;
  end;

  procedure enable_constraints(p_owner varchar2, p_table varchar2, p_column varchar2) is
    l_sql varchar2(512 char);
  begin
    for l_constraint in (select owner, table_name, constraint_name from ALL_CONS_COLUMNS 
                                where owner = p_owner
                                  and table_name = p_table
                                  and column_name = p_column)
    loop
      -- disable constraints 
      l_sql := 'alter table ' || l_constraint.owner || '.' || l_constraint.table_name || ' enable constraint ' || l_constraint.constraint_name;
      dbms_output.put_line(l_sql);
      execute immediate l_sql;
    end loop;
  end;
  
begin
  dbms_output.put_line('Create temp column');
  
  -- beware oracle 30 char naming limit
  select 'TEMP_COLUMN_' || dbms_random.string('U', 10) into l_temp_col from dual;
  l_sql := 'alter table ' || p_owner || '.' || p_table || ' add ' || l_temp_col || ' ' || p_format;
  dbms_output.put_line(l_sql);
  execute immediate l_sql;
  
  -- copy values to the new column, if values don't fit into new column, but only for upper bound (e.g. the whole number), I get ORA-01438
  -- for fractions, it doesn't work that way
  l_sql := 'update ' || p_owner || '.' || p_table || ' set ' || l_temp_col || ' = ' || p_column;
  dbms_output.put_line(l_sql);
  execute immediate l_sql;

  -- validate that values are same in new format as were in old format
  l_sql := 'select listagg(id, '','') within group (order by id) from ' || p_owner || '.' || p_table || ' where ' || p_column || ' - ' || l_temp_col || ' != 0';
  execute immediate l_sql into l_diff_ids;
  if l_diff_ids is not null
  then
    -- drop temp column
    execute immediate 'alter table ' || p_owner || '.' || p_table || ' drop column ' || l_temp_col;
    raise_application_error(-20010, 'Values are different in the new format ' || l_diff_ids);
  end if;

  dbms_output.put_line('Disable constraints');
  disable_constraints(p_owner, p_table, p_column);
  
  -- set old to null
  l_sql := 'update ' || p_owner || '.' || p_table || ' set ' || p_column || ' = null';
  dbms_output.put_line('Change format of the column ' || p_column);
  dbms_output.put_line(l_sql);
  execute immediate l_sql;

  -- change format 
  l_sql := 'alter table ' || p_owner || '.' || p_table  || ' modify (' || p_column || ' ' || p_format || ')';
  dbms_output.put_line(l_sql);
  execute immediate l_sql;

  l_sql := 'update ' || p_owner || '.' || p_table || ' set ' || p_column || ' = ' || l_temp_col;
  dbms_output.put_line(l_sql);
  execute immediate l_sql;
  
  -- drop temp column
  l_sql := 'alter table ' || p_owner || '.' || p_table || ' drop  column ' || l_temp_col;
  dbms_output.put_line(l_sql);
  execute immediate l_sql;
  
  dbms_output.put_line('Enable constraints');
  enable_constraints(p_owner, p_table, p_column);
end;
/

It is not the prettiest code in the world, but it works.